Hello dear crafters, This is Harika and today I am on craftsneed blog with a lovely album.
As Valentine’s Day is round the corner, I’m going to show you a very simple pocket mini album.
For this I have used chipboard and cut them into the size given below. Later I stick them on a cardstock of 13 ½ * 6 inch length leaving 1/16 inch space between each piece.
I have cut all the four edges at 45 degree angle and attached it with tacky tape on all the four ides of the cardstock and flipped the cardstock over the chipboard.
I have made the spine using hidden hinge binding system and attached it to the inside part of our 1 ¾ inch spine.
For the pockets I have used bob n betty amor mio 6*6 paper pad. I have cut the pattern papers according to the measurement shown in the pic.
After that step I have folded the pocket according to the line shown on our paper.
Next I have applied glue on the two side flaps of 5 ¼ * 4 ¼ inch size paper and glued it to the backside of 4 ¼ * 6 inch paper.
Envelope pocket I read and now attach 5 ¼ * 2 inch paper to the front side of 4 ¼ * 6 inch paper.
I have made 4 such pockets.
To make closure of the album I have made this chunky charm and I have attached it to the album using magnet.
I have distressed the whole album using vintage photo distress ink and made these tags for my pockets.
And decorated he front page and spine with vintage look here are some snapshots of the project.
Valentines Day is few days away and we have started celebrating love on our blog.Today we have a lovely project by our Dt Riddhi....remember its all about LOVE...Over to Riddhi.
Hello Crafty peeps, today I have a wonderful heart frame. I made it as a DT post For CraftsNeed.
I have used pattern paper from Nakshatra Designs available at Craftsneed store.
I have taken Card stock and cut in heart shape.I have stuck the lace at the borders. Then adhered the pattern paper over it.
Stamped the Love Sentiment from Mudra Stamp set.
Placed the MDF frame and decorated with leaves and flowers.I have made flowers too from same card stock and pattern paper.
I have attached two small hearts, where initials of the couple can be written. Have placed a charm.
Now, whats the gift without any messages with it, So i have a wooden clip holding two small messages tags.
Few More Shots:
That's It. Hope you all liked it. Do pour some love in comments.
For all the craft supplies, do visit http://www.craftsneed.com/ , one stop shop for all your craft supplies.
Today I am on Craftsneed blog with a Quilled key holder frame,I have been doing Quilling for last 5 years and have tried many brands and varieties of strips.You will find it funny but sometimes i have cut my own strips.
So this time i shopped from http://www.craftsneed.com/ and believe me the strips are of premium quality with such great range of colors. The store keeps variety of sizes like 2,3,5,7 and 10mm in single color,family pack and also multi color packs. The tools are super cool with best quality.Honestly after receiving the parcel I just wanted to go on and on with quilling...
Here's the frame I made,This frame is done with 3mm strips
Yes,A mandala quilled frame...I started with the center making it a big circle strips of various colors joined to each other and then attached it to base sheet.The tear drops and tight coils have been done separately and attached keeping the geometry and symmetry in proportion.Lastly I embellished with few small kundan beads.I have used clear glue to fix it right from starting till end.
So don't waste time and start with a new hobby.Teach your kids,kids just love quilling...or make these key holders for gifting,they definitely make a perfect gift for all occasions. Attaching few more close ups for reference.
This post will show how I made a circular box full of tags which can hold pics or messages. I have used Nakshatra Designs paper. U can buy them from HERE
TUTORIAL:
Firstly cut two round shapes from card stock and pattern papers. Also, cut a long strip, as long as the circumference of the circle.
Stick them vertically to the strip, forming the box. And keep the opening, un-sticked. Then start making inside stuff, I made few tags for it. But there are endless possibilities like mini-album, photos, etc..
For closure, I have used a ribbon to close the box. (Forgot to click the pic). Just have a punch, set the eyelet and insert the ribbon
And lastly the decoration part. I haven't made it much loaded with decorations, tried to keep it simple.
I’m glad to be guest designing at Craftsneed today! Thank
you Bhavani Balaji for this lovely opportunity J
It is the start of a new year and I bring to you a tutorial
to make your own beautiful desktop calendar!
Sit back and enjoy this picture heavy post!
Step 1:
Take 4 pieces of cardstock measuring 4 inches x 4 inches
Step 2:
Score at 1 inch on all the 4 sides, for all the 4 pieces.
These make the drawers.
Step 3:
Cut small pieces out of the flaps so that they fold properly
to make a box.
Step 4:
Glue the corners and let them dry. Finish all the 4 boxes in
the same way.
Step 5:
Now for the boxes to hold the drawers, take 4 pieces of
cardstock measuring 2 1/8 inches x 7 ¼
inches. Score them 1 inch, 3 1/8 inches, 4 1/8 inches and 6 ¼ inches as shown
in the pic.
Step 6:
Fold them so that the first and last flap overlap and glue
the flaps together to make a box. Finish 4 boxes similarly. These boxes
resemble the outer cover of a matchbox.
Step 7:
Take 4 squares of patterned paper measuring 1 ¾ inches. I’ve
used the Exquisite Blossoms paper pack from Nakshathra Designz. They have
beautiful floral designs perfect for any occasion!
Step 8:
Stick them to the inside of the 4 drawers.
Step 9:
Take 2 squares of cardstock measuring 4 ¾ inches.
Step 10:
Insert the 4 drawers into the 4 boxes. Take one of the 4 ¾
inches square and place the boxes in the center and glue them together. To hold
the boxes together, I’ve used cellotape.
Step 11:
This is how the drawers open up.
Step 12:
Take another cardstock measuring 4 ¾ inches x 9 ½ inches.
Score it at the middle 4 ¾ inches and 2 3/8 inches. This forms the easel.
Step 13:
Take patterned paper square of size 4 ½ inches and attach it
to the inner side of the easel as shown.
Step 14:
Fold along the score lines as shown to get this shape, for
the easel
Step 15:
Glue this easel onto the drawers base.
Step 16:
Take the other 4 ¾ inches square and glue on the lower half
of the easel (marked with white stripes). Sorry missed taking this pic!
Step 17:
Now I switched back to the drawers and boxes and covered
them with patterned papers. I’ve also added brads for the 4 boxes to act as knobs for the drawers.
Step 18:
For the calendar, I took a free printable from the internet
and printed on white cardstock. I’ve then cut the months separately and
distressed using Seedless Preserves.
Step 19:
Spray a fine mist of water on the distressed sheets to get a
wonderful effect.
Step 20:
I then made a holder for the monthly sheets. Folded a small
sheet of paper to make the photo corners, and embellished with flowers. This
makes the calendar reusable for many years and can also be substituted for
photos.
Step 21:
For the stopper of the easel, I took a cardstock measuring 3
inches x 1 ¾ inches. A patterned paper piece slightly smaller than the base and
used a corner rounder for all the 4 corners.
Step 22:
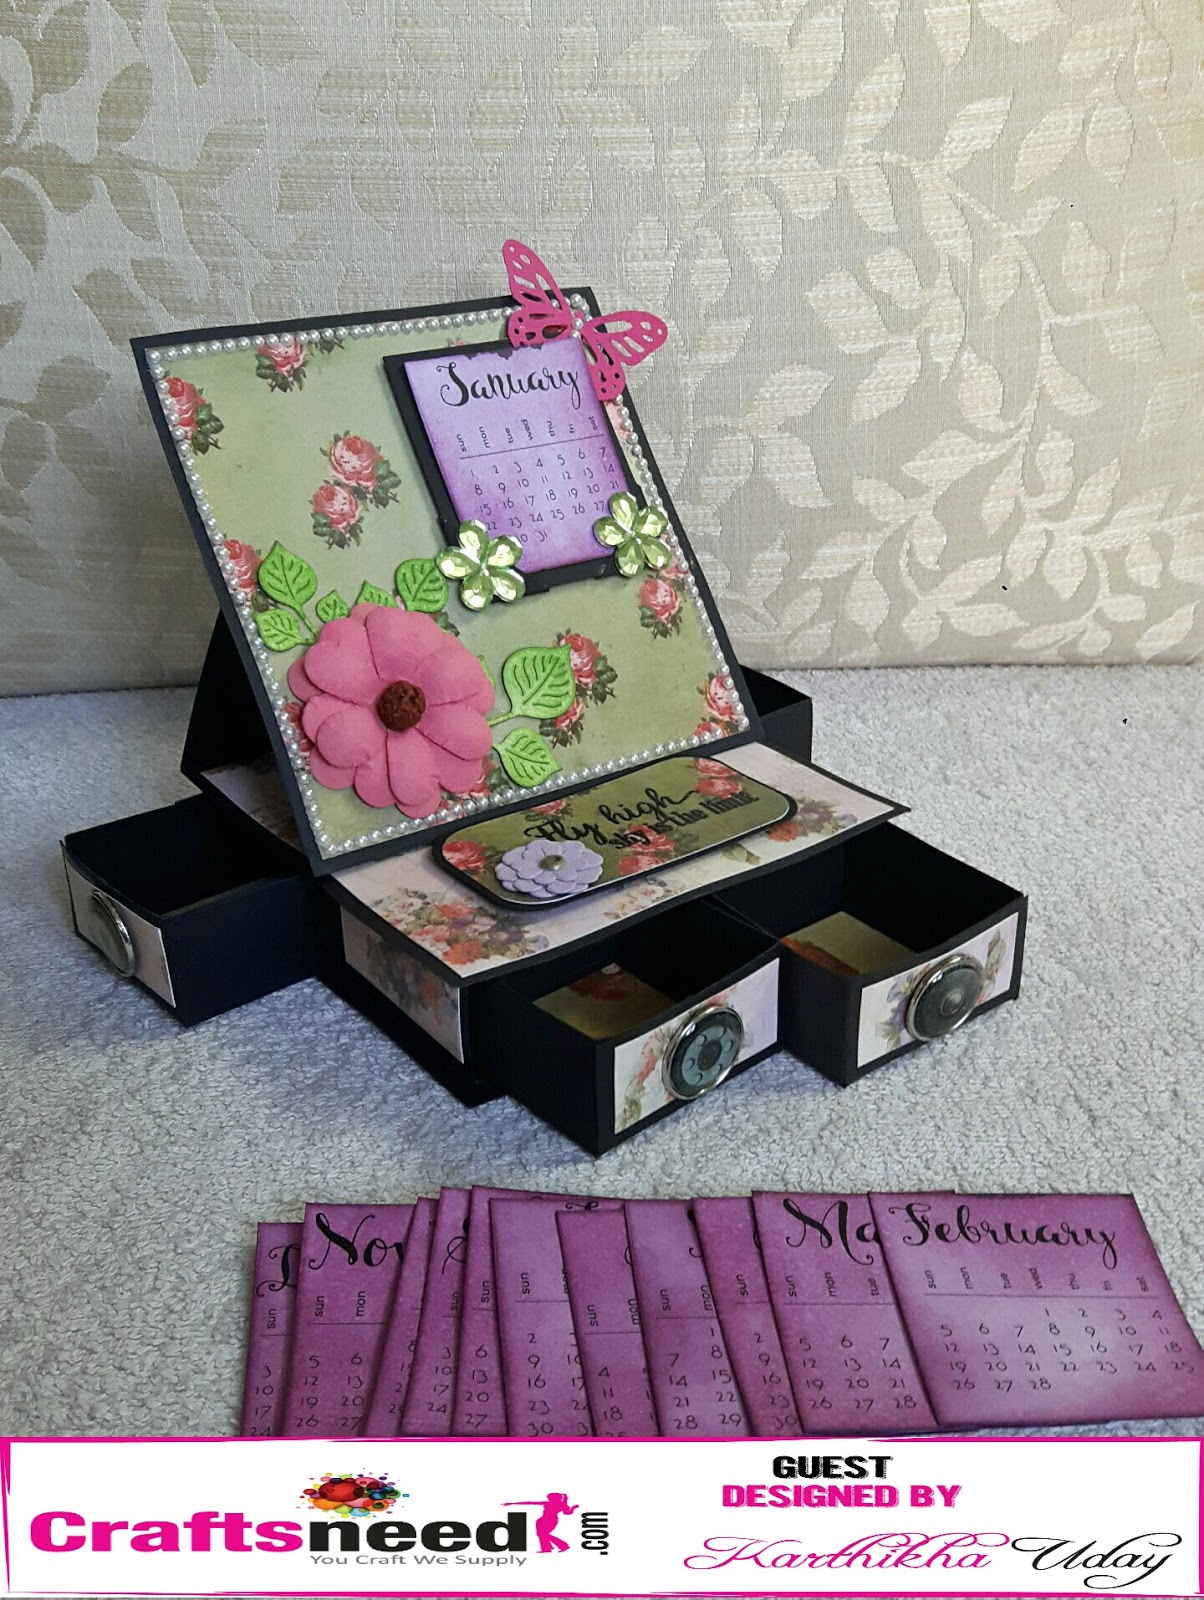
Embellish as per your choice J
I’ve stamped a sentiment from Mudra Humming Birds stampset using Versamark and
heat embossed in black. I also attached a mini flower brad next to the
sentiment. Attach this panel using foam tape so that It makes the stopper for
the easel. I’ve embellished with a big flower along with some diecut leaves and
a butterfly. I gave one round of pearls to the top panel to add more interest.
Fill up the drawers with your favourite mini goodies J I’ve used 2 of the drawers to
store the monthly sheets so that I can change them easily.
Here is my finished pic!
Here is a little video :)
Hope you like my creation! This calendar adorns my office
desk now J