Hello Everyone!
I’m glad to be guest designing at Craftsneed today! Thank
you Bhavani Balaji for this lovely opportunity J
It is the start of a new year and I bring to you a tutorial
to make your own beautiful desktop calendar!
Sit back and enjoy this picture heavy post!
Step 1:

Take 4 pieces of cardstock measuring 4 inches x 4 inches
Step 2:

Score at 1 inch on all the 4 sides, for all the 4 pieces.
These make the drawers.
Step 3:

Cut small pieces out of the flaps so that they fold properly
to make a box.
Step 4:

Glue the corners and let them dry. Finish all the 4 boxes in
the same way.
Step 5:

Now for the boxes to hold the drawers, take 4 pieces of
cardstock measuring 2 1/8 inches x 7 ¼
inches. Score them 1 inch, 3 1/8 inches, 4 1/8 inches and 6 ¼ inches as shown
in the pic.
Step 6:

Fold them so that the first and last flap overlap and glue
the flaps together to make a box. Finish 4 boxes similarly. These boxes
resemble the outer cover of a matchbox.
Step 7:

Take 4 squares of patterned paper measuring 1 ¾ inches. I’ve
used the Exquisite Blossoms paper pack from Nakshathra Designz. They have
beautiful floral designs perfect for any occasion!
Step 8:

Stick them to the inside of the 4 drawers.
Step 9:

Take 2 squares of cardstock measuring 4 ¾ inches.
Step 10:

Insert the 4 drawers into the 4 boxes. Take one of the 4 ¾
inches square and place the boxes in the center and glue them together. To hold
the boxes together, I’ve used cellotape.
Step 11:

This is how the drawers open up.
Step 12:

Take another cardstock measuring 4 ¾ inches x 9 ½ inches.
Score it at the middle 4 ¾ inches and 2 3/8 inches. This forms the easel.
Step 13:

Take patterned paper square of size 4 ½ inches and attach it
to the inner side of the easel as shown.
Step 14:

Fold along the score lines as shown to get this shape, for
the easel
Step 15:

Glue this easel onto the drawers base.
Step 16:

Take the other 4 ¾ inches square and glue on the lower half
of the easel (marked with white stripes). Sorry missed taking this pic!
Step 17:

Now I switched back to the drawers and boxes and covered
them with patterned papers. I’ve also added brads for the 4 boxes to act as knobs for the drawers.
Step 18:

For the calendar, I took a free printable from the internet
and printed on white cardstock. I’ve then cut the months separately and
distressed using Seedless Preserves.
Step 19:

Spray a fine mist of water on the distressed sheets to get a
wonderful effect.
Step 20:

I then made a holder for the monthly sheets. Folded a small
sheet of paper to make the photo corners, and embellished with flowers. This
makes the calendar reusable for many years and can also be substituted for
photos.
Step 21:

For the stopper of the easel, I took a cardstock measuring 3
inches x 1 ¾ inches. A patterned paper piece slightly smaller than the base and
used a corner rounder for all the 4 corners.
Step 22:
Embellish as per your choice J
I’ve stamped a sentiment from Mudra Humming Birds stampset using Versamark and
heat embossed in black. I also attached a mini flower brad next to the
sentiment. Attach this panel using foam tape so that It makes the stopper for
the easel. I’ve embellished with a big flower along with some diecut leaves and
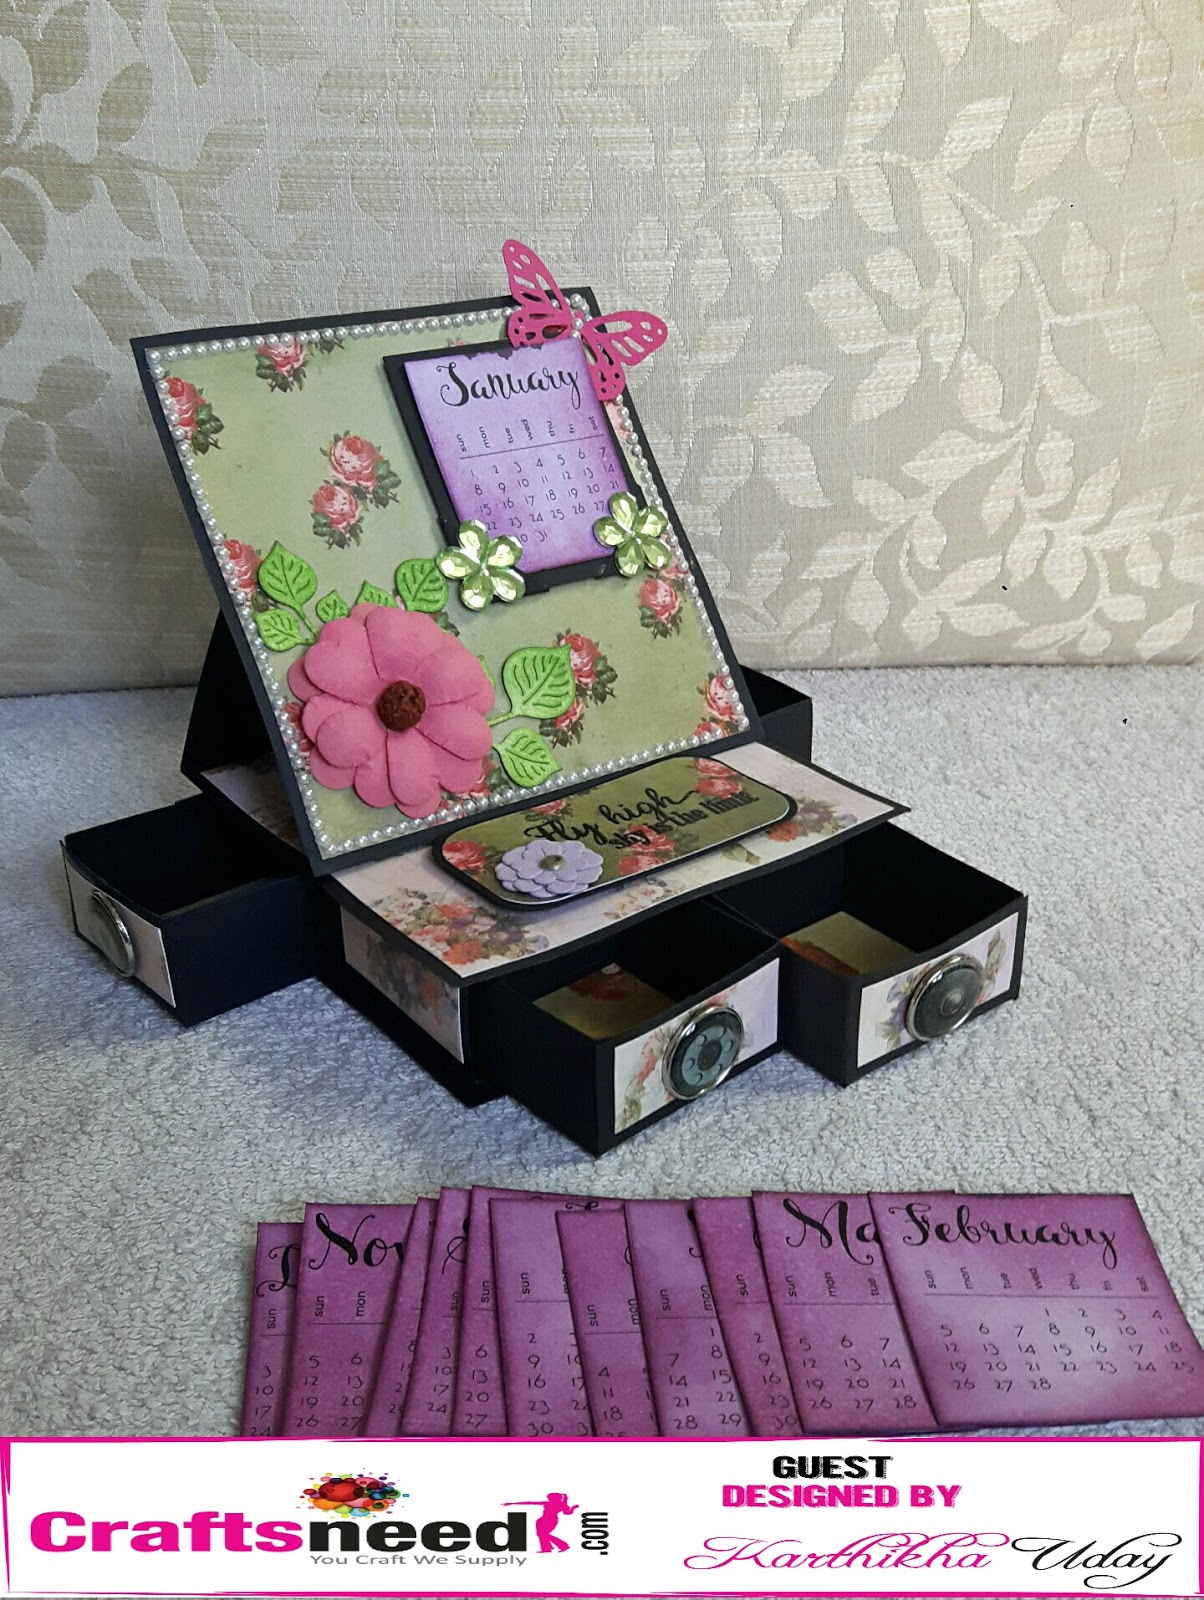
a butterfly. I gave one round of pearls to the top panel to add more interest.
Fill up the drawers with your favourite mini goodies J I’ve used 2 of the drawers to
store the monthly sheets so that I can change them easily.
Here is my finished pic!


Here is a little video :)
Hope you like my creation! This calendar adorns my office desk now J
Hope you like my creation! This calendar adorns my office desk now J
Happy crafting J
Thanks again for this opportunity :)
ReplyDeleteWOW KARTHIKA COMMENDABLE JOB. BEAUTIFUL CALENDER LOVELY DESKTOP PIECE... ENJOYED YOUR TUTORIAL AND VIDEO ASWELL!!! CHEERS.
ReplyDeleteThanks a lot for all those kind words and encouragement :)
DeleteWow.. Such a awesome tutorial.. Love every details ka
ReplyDeleteThanks a lot dear :)
DeleteAwesome creation karthikha....loved it...thanks for sharing the Tut...
ReplyDeleteThanks a lot Sindhu :)
DeleteWow very useful and awesome tutorial.
ReplyDeleteThanks a lot Grishma :)
DeleteLovely project...Thnks for the Tutorial
ReplyDeleteThanks a lot Anu :)
DeleteMarvelous card with Nice tutorial
ReplyDeleteThanks a lot appa :)
DeleteBeautiful and neat work... Very nice Karthikha...
ReplyDeleteThanks a lot Anila :)
DeleteLovely, detailed tutorial.😊👏🏻👏🏻👌🏻
ReplyDeleteThanks a lot :)
DeleteO wow superb creation
ReplyDeleteThanks a lot Pooja :)
DeleteAwesome creation.Love the way u have used Nakshathradesignz pattern paper.
ReplyDeleteAwesome!
ReplyDeleteThank you Kriti :)
Deletewowwwww
ReplyDeleteThank you :)
Delete