Hello and welcome everyone.
Today I have made a DT project for craftsneedindia.blogspot.. Its my first post for it and I am bit nervous and excited too..
Today I am gonna take you to land of fairies. Yes you heard it right, Fairy Land. And I have its tutorial too. So sit back, relax and enjoy the tutorial.
Firstly, the final look of my project.

Instructions: Take a waste cello tape roll and color it Green.Now for base, take the inner diameter of the roll and fix that circular board inside it and glue it so that it wont come out. and paint it with same color from outside.


Now on to next step of making grass. Take a green colored paper and cut the strips from it in shape shown below:


I have taken 3 strips of A4 size. and for the first strip start sticking it to the inner wall of roll. And for the next layer, glue to the bottom tip of strip, vertically and not on sides.Then stick the strip vertically inside in the circular shape co-coordinating with the roll. You can make it as dense as you want.Now lets move on to main thing, that is Fairies and flowers. I have Stamped, colored and fussy cut few fairies and birds. The first image shows the stamped images. I used different shades to color all the fairies as I wanted it to be colorful. For this particular fairy, I used DI Frayed Burlap, tattered rose, Memento Tangelo, Lilac poises and Dandelion. I colored them using KOI water-brush.

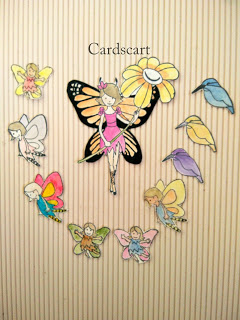

You might notice, the fairy shown in the second pic is having a layered dress. I tried to give it a 3D look by adding dress layers to it. (hope the pic shows the effect).
I made few different flowers from Iris paper available at http://www.craftsneed.com/
The best part of this project, the secret message. I made a mini accordion fold card using card stock and Nakshatra designs paper available at www.craftsneed.com/nakshathra-designz
Pinned it with a matching U-pin, that also from CraftsNeed. I just loved this pin and the way it matches with my theme..
Now, one more way to hold secret message. See the pic below and you will understand all by yourself.
One thing you should take note of that the color of card stock I chose is Green, as it matches with the grass and is not easily visible at first sight. So it does really keep secret.


Now, all fairies, flowers, birds, and messages are ready to go in the garden. but before that lets decorate the garden from outside too.
I have used a lace to adhere the border.
and used the pink small flowers on side. and used few pearls to add some bling.
Now, start arranging all. This part can be done as per your wish. I started with the largest fairy standing at the backside. and placing them one by one and you are DONE !!
P.S. You are not sticking any fairies and flowers to the roll if you are keeping the hidden message below them. If you do so, your message won't come out and it will be hidden forever !!


I love the way fairy is putting her hand in the flower.

List of Supplies :
Cardboard and cello tape Roll
Card stock
Fairy Stamp set
Iris paper
Distress inks (for coloring the fairies and flowers)
Memento inks (for coloring the fairies and flowers)
Pearls, Laces
Nakshatra Designs Paper stack
Message bottle
All supplies used are available on the site.You can also place a preorder. Hope you like my project. Do share your views in comments.
Thanks,
Hugs,
Riddhi Shah
HI RIDDHI
ReplyDeleteWOW WONDERFULL CREATION!!.LIKE THE FAIRIES AND FLOWERS VERY MUCH... KEEP ROCKING...
Loved this creation Riddhi:)!
ReplyDeleteThank you so much
DeleteLovely creation Riddhi 😍 The fairies are so cute 😊
ReplyDeleteThanks Karthika
DeleteAwesome Ridhhi.. loved it to bits and pieces.. the way u used stamps, message bottle.. and recyled cello tape roll is great..
ReplyDeleteThanks for appreciating afreen.
DeleteVery pretty project Riddhi...i loved the recycling...good work,keep it up!!
ReplyDeleteThanks a lot Anushree..
DeleteLovely Creation... Fairies are very beautiful
ReplyDeleteWow.. Beautiful scene....
ReplyDelete