Thursday 15 February 2018

a quick candlight

Why to make every project complicated if you have such wonderful papers in the market... we always run short of time during the festivals...presenting a very quick project which u can make in just half an hour to give life to your festive decor....


Here is  a second small project from the parchment pattern paper from Craftsneeds.com and its a Candlelight holder

Hows that friends? Hope you like it and would definitely love to know how to make it...so here is the procedure

For this project again u need -
1. Dark Green Cardstock
2.Pattern parchment paper from Craftsneed.com
3. Few mulberry flowers, antique gold half pearls, Few die cuts

Step To follow

1. Cut the required height from the parchment pattern paper and stick die cut borders on one edge


2. Make a cylinder from this opaque sheet and stick the edges.
3. Stick golden pearls on the die cut base in a circular way.
4. Decorate this base with mulberry flowers and other die cuts.
5. Place the prepared cylinder on this decorated base and your stand for candlelight
is ready....☺☺☺


If you liked my project, do leave some love below and Happy Holidays


Glow in the dark shadow box

Now this one is the bigger than all... again the use of same 12 X 12 Parchment paper and one more amazing project... so happy and excited to make this... and the outcome is superb.


Now for this fabulous project u will need:
1. Dark Green Cardstock
2. Pattern Parchment Paper
3. MDF frame cutout, MDF Swirls cutouts
4. LED
5. Few Die Cuts, Decorative laces and mulberry flowers

Steps to make:

1. Make a shadow box from the Dark Green Cardstock and fix LED in it.

2. I embossed the MDF swirl cut outs with chunky white embossing powder first to get the desire texture and than again done Gold embossing on it to get such effects... u can also get such effects with the texture paste.. I tried something different as this time i did not want to use any wet mediums


3. paste these swirls in mirror position on the cardstock and  fussy cut from the outer side

4.place the pattern parchment paper in the center and stick it...


5. I also used a small MDF frame to fix up the pic in this....


6. Stick mulberry flowers and some die cuts to decorate it

here are some more clicks....


Tuesday 9 January 2018

Hi friends
Wow!!! What a Parchment Paper Quality. Just love making these project.
See the magic of these three awesome projects with a single 12 X 2 Scrapberry's HollywoodVellum
parchment pattern paper. Thank you Bhavani Balaji and Craftsneed.com for such a lovely paper.

Two layered "Just For You" Card

So here presenting the first little project from the paper. Its a two layered JUST FOR YOU card.

You need the mentioned stuff to make this....
1. Dark Green 230GSM Cardstock
2. Parchment Pattern Paper from Craftsneed.com
3. Ranger Gold Embossing Powder
4. Versamark Marker 
5. Few die cuts,Twine and tags to decorate the card

How to make:

1.Cut the Dark Green Cardstock and the parchment pattern paper as per your required size of the card.


2. Can give some extra dimension to the parchment pattern paper with the parchment tools.

3. Have used Versamark pen on the die cuts to emboss it with the Gold Embossing Powder.


5. Prepared two same die cuts ..One for the First Layer and the second for the other layer of the card

6.Also distress some tags to put it inside..


7. First stick the die cut on inner layer of the card and top of it place the 2nd die cut on the first layer.


 8.Tie the twine along with the tags of the sentiments to the sides


9.Decorate the card by putting extra white dots to the edges to give more elegance.

10. Make a small triangular pocket in the inside portion of the card to insert the tags and your two layered semi transparent card is ready...


If you liked my card, please pour in your precious comments below. Thank you.


Products used from Craftsneed.com


Cardstocks
Parchment Pattern Paper


Friday 29 December 2017

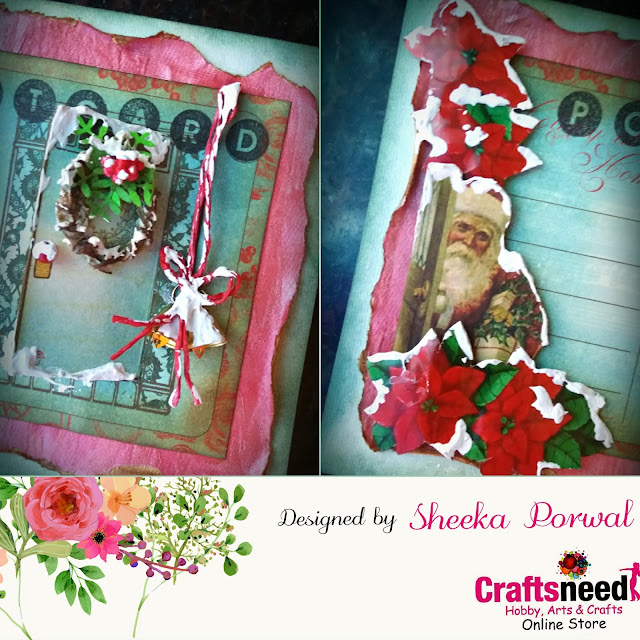
Christmas postcard card from Santa

Hello there back with another card for craftneed blog post a postcard card...
This winter thought of gifting one of my close friend a Santa card with style.
I used  this card stock postcard from Santa pattern paper from scrap berry's. Its a double sided pattern paper. and u can buy this here


I had pre printed those poinsettia on my laser printer and fussy cut them and little shaped inward with my ball tool  . From the same cardstock I fussy cut a Santa Claus. 


time for colors. Used shades of distress inks and giving a little aged look on edges.. 


I used a pearl pink color scrap paper from my trash for the base on my card. and stamped "POSTCARD" on top of the base  postcard. Since there was a door I cutout to give a 3d look of door opening and with my sentiment stamped inside with versamark black ink.


Below is the stamp I used for sentiment and applied a thin layer on over it with my gesso be careful not to brush too hard or it might smear the ink.


From the leftover handmade scrap paper I made my wreath and coloured with distress ink.


now final application of my elements.... 


yes not to forget the snowy effect with my modelling paste to give more chilling look to my age old looking project...


that's how I am going to wish my friend by opening the doors and letting all the Christmas and new year  wishes ....


wishing all the people out there a very Merry Christmas and Happy New Year....
will see u all next year with something new...bye..


Friday 1 December 2017

Time to welcome Santa with a beautiful mixed media frame


Dashing through the snow
In a one-horse open sleigh
O'er the fields we go
Laughing all the way
Bells on bobtail ring'
Making spirits bright
What fun it is to ride and sing
A sleighing song tonight!

These words kept ringing around my ears until I made this beautiful Mixed media frame. I completely tried to replicate the above lines in my art work.. Added some snow, horse, green bells, colors as per the soothing mood that sets in during the beautiful arrival of Santa. 

Since our childhood we have always heard Santa giving us gifts, but why not decorate the main door this time with a beautiful piece of Mixed Media and welcome our dear Santa home.

So once again I am back with my new project based on the coming festival.....
To make this beautiful mix media frame i used the listed material shown at the end of all instructions
I am also putting step by step instructions to understand you the project well 
1. to create this project the very first step is to give a textured layer  to the chipboards we have with texture paste 

2. next step is backing up the frame with black cardstocks


3.Assemble all chipboards as per your own choice taking care of the balancing all objects and colour it


4. collect all decoratives u have readily available with you to decorate your frame
here i have made few paper flowers and leaves, also created tassel from wool and some golden and white different sizes pearls
5. Gave some extra decoration  to the chipboard christmas tree,, with some stars hanged on the strings, decorative stones and gave effect of snow with small white pearls on top of the tree

6.Decorate the frame with the flowers and leaves golden pearl hangings


few more closeups......


Material used:


Wishing u all a very Happy December and the beginning of a beautiful festival. If you liked my project do leave some love in the comment section below

Sending Christmas hugs,
Apexa Singh

a quick candlight